Member-only story
Computing NDVI from Sentinel 2 Imagery
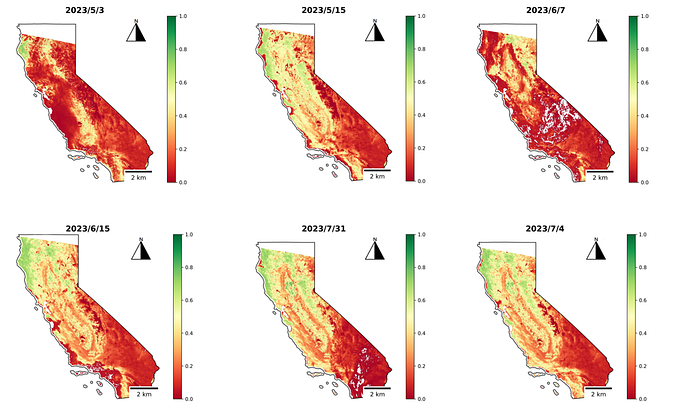
NDVI is a vegetation index that utilizes the contrast between near-infrared light (which is highly reflected by vegetation) and red light (which is absorbed by vegetation) to evaluate vegetation density. NDVI values range from -1 to +1, with a value of 0 indicating the absence of green vegetation. Higher NDVI values indicate a greater density of green leaves, with values ranging from 0.8 to 0.9 suggesting the highest possible density. However, there is no specific NDVI threshold for each land cover type.
My previous article about NDVI.

The formula for calculating NDVI is as follows:
NDVI = (NIR — RED)/(NIR + RED)NIR — reflection in the near-infrared spectrum
RED — reflection in the red range of the spectrum
The output range of NDVI calculation typically varies from -1.0 to 1.0.
Normalized Difference Vegetation Index (NDVI) value range = -1 to 1Compared to other wavelengths, healthy vegetation (chlorophyll) reflects more near-infrared (NIR) and green light. It does, however, absorb more red and blue light.
Calculate NDVI for Sentinel 2 using geemap and GGE
In this tutorial, I will demonstrate how to calculate and visualize NDVI using the geemap in Jupyter.
Code Section:
Import the Module and authenticate google earth engine
import geemap
import ee

geemap.ee.Initialize()
Define area of interest for the computation of NDVI
I get New Zealand boundary. You can change to another country.
# get New Zealand boundary
aoi = ee.FeatureCollection("FAO/GAUL/2015/level0").filter(ee.Filter.eq('ADM0_NAME','New Zealand')).geometry()
Define function for EVI computation
def getNDVI(image):

    # Normalized difference vegetation index (NDVI)
    ndvi = image.normalizedDifference(['B8','B4']).rename("NDVI")
    image = image.addBands(ndvi)

    return(image)